Thursday, August 27, 2015

Snoqualmie Tunnel - 10 minute walk near Snoqualmie Pass

The Snoqualmie Tunnel on the Iron Horse Trail is located near Hyak off of I-90’s Snoqualmie Pass.  This is an incredibly easy and incredibly fun experience!  Although this is a quick and easy walk, the experience of walking into a pitch black tunnel is so unique this is a must-do experience!  Because it's only 5 minutes from the parking lot to the tunnel's entrance along a flat, gravel path, this adventure is easily accessible for strollers and wheelchairs.  Bicycles are allowed on this popular trail, so this could be a fun destination for adventures comfortable with off-road biking, too.

To start out, we headed west from the parking lot.  We passed a couple of informative signs on either side of the trail and used the bike path to bypass the small gate.

Here is an example of how flat the path is.  Because it was 80 degrees outside, we started out in bright, short-sleeve shirts and a glow-in-the-dark necklace because someone couldn't wait to get to the tunnel until he cracked it aglow.

As we approached the tunnel, we felt cold air slowly flow out of the tunnel.  Before entering, we put on coats.  We also got out our headlamps, flashlights, and Jake put on his vest with reflectors.  Because this tunnel is popular with bicyclists, it is important for hikers to wear bright clothing that cyclists can see easily.  It would be a great idea to hang a reflector or some kind of light on the back of backpacks or jackets, too.

After the obligatory photo, Jake bravely enters the unlit tunnel.

Jake liked checking out these nooks as we saw them in the tunnel.  I'm guessing that they were a sort of emergency shelter for anyone caught in the tunnel when a train came through.

As it darkened, our normally adventurous little guy walked closer and closer to me.  From this point on, he would not stand out of arm's reach.  I did have him wear an emergency whistle, though, just in case we got separated and all of our lights went out, although I was glad that we never needed it.
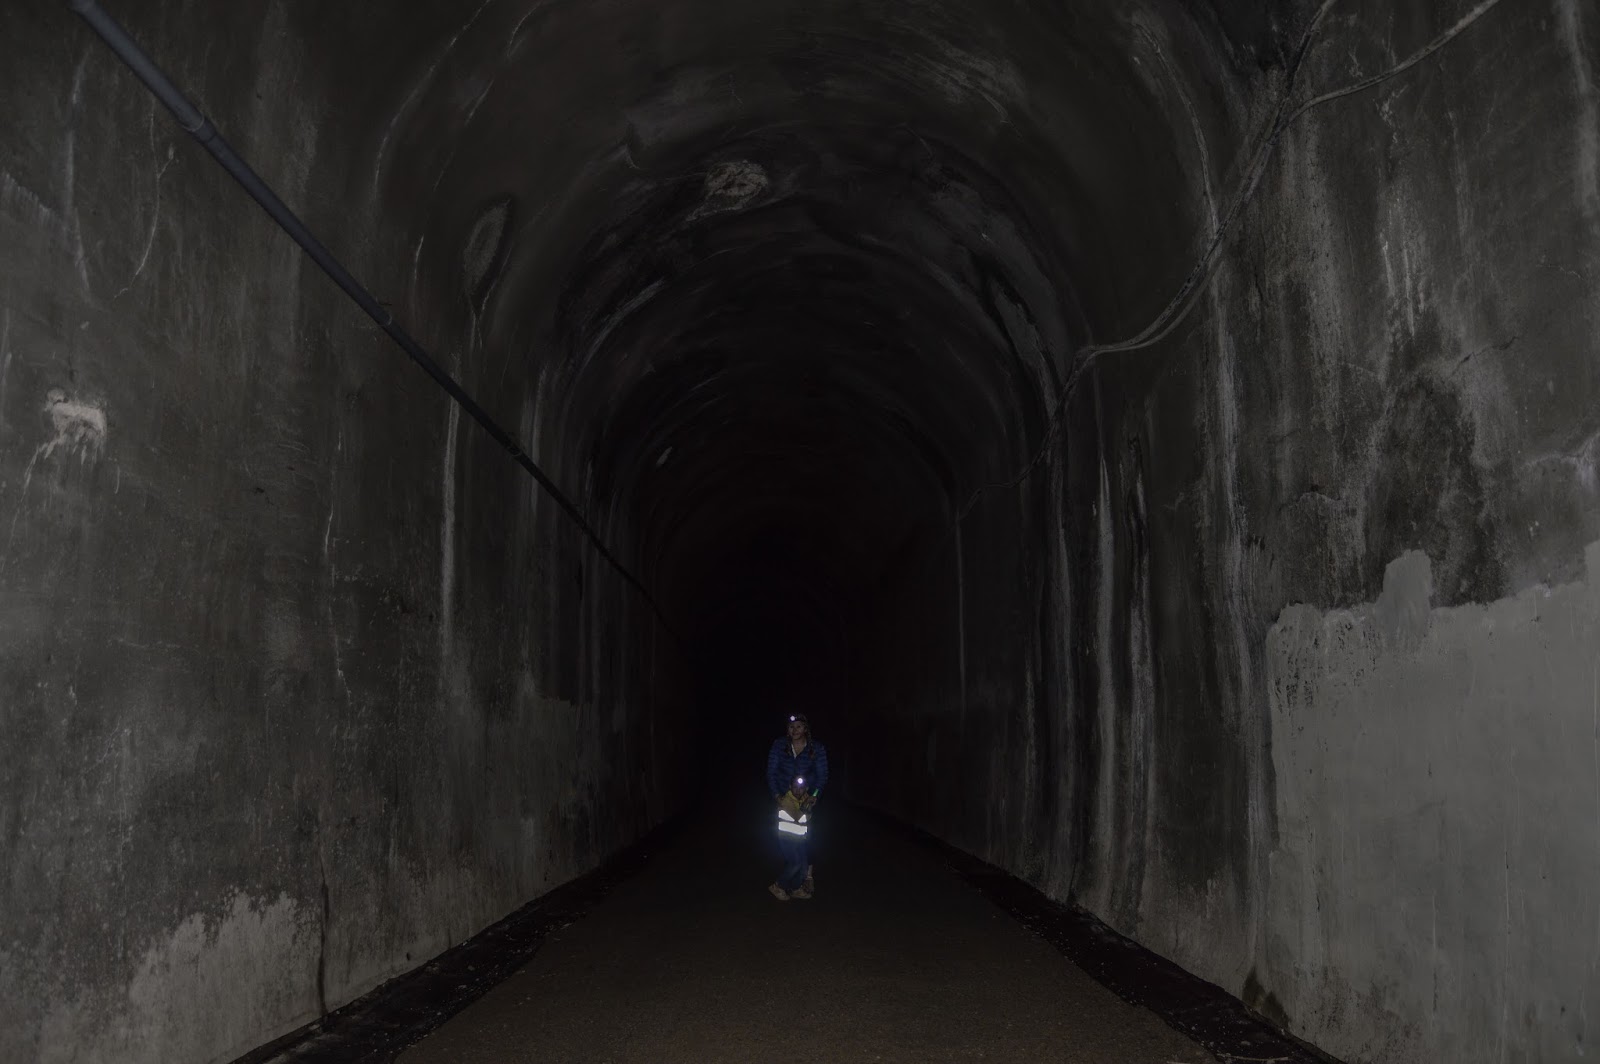
It got dark quickly!

We added the rest of the glow-in-the-dark necklaces and bracelets and made sure that all flashlights and headlamps were on.

 He's thinking about whether he wants to go further.  I told him we can turn back at any time.  I knew ahead of time that we would not walk the entire length of the tunnel.  It's 2.2 miles long, and since we tend to hike about 2 miles per hour, that would mean 2 hours of walking out and back in the tunnel.  Instead, we planned to just go as far as he wanted.  Here, he decided to try going a little farther.

Although we did end up going father than this, we always kept the entrance within view.
 
The other end of the tunnel, about 2 miles away, is visible as a small dot of light near the upper right.  Jake pretended to have light sabre battles with his glow-stick and we both wished that I had thought to bring his light-up light sabres we picked up at Great Wolf Lodge a while ago.  I highly recommend bringing any light-up light sabres, wands, jewelry, etc.

After about 20 something minutes, Jake was ready to turn around.  In addition to being dark, it was surprisingly cold.  Although it was 80 degrees outside, both of our hands and fingers started becoming uncomfortably chilly.  It was great to see the sunshine again!  This tunnel was such an easy and fun experience I'm sure we will be back.  It remains open May 1st - October 31st every year.  It could be fun to get a group together in costumes and have a spooky Halloween tunnel walk sometime in October.


BEFORE YOU GO
1. Be aware that the tunnel is only open May 1 - October 31st every year. 
2. Plan to have a Discover Pass.  Either plan to purchase a day pass on site at the electric meter in the parking lot ($10 or $11) or else have a yellow annual pass on hand, which must be purchased ahead of time.  A list of vendors is available here: http://www.discoverpass.wa.gov/31/About-the-Pass and includes any REI store.
3. Check out Washington Trails Association page with more info.  Scroll to the bottom of the page and look through trip reports for recent photos and weather conditions: http://www.wta.org/go-hiking/hikes/iron-horse-tunnel
4. The inside of the tunnel gets chilly.  When we went, it was an 80 degree day.  Even though we brought light jackets, our fingers started becoming uncomfortably cold within 20 minutes.  Long sleeves, coats, and gloves are recommended even on a hot summer day.
5. It becomes pitch black in the 2 mile long tunnel, with only little pinpoints of light available at either end.  Bring a flashlight for everyone in the party. 
6. Sound travels far and the tunnel is narrow so it is unlikely that anyone would feel lost from a group.  A whistle for kids could be reassuring, although we never needed it.  My adventuresome 5 year-old never wanted to be father from me than about 4 inches.
7. Because it gets dark quickly, glow-in-the-dark sticks, light-up light sabers, light-up wands, light-up bouncy balls, etc. could be fun and help keep the mood party-like rather than scary.
8. The tunnel is popular with bicyclists, who can zip by quickly.  To help them see you, it is a great idea to have a blinking light, reflector, reflector vest, or even a white shirt tied to backpacks, or at least the backpack of the person who tends to be at the back of the party.
9. There are restrooms in the middle of the parking lot with running water. 
10.  Because this is right off of I-90, cell service can be available, although it is not guaranteed.  Download directions and a map to your phone before setting out, just in case.

 
GETTING THERE
The trailhead for the Iron Horse Tunnel is the same parking lot as the Hyak Sledding Hill in the winter.
Address: For GPS, try entering: 15 Keechelus Boat Launch Road, Snoqualmie Pass, WA 98068. This may not be recognized by all GPS systems, but it may get you close.
Link to map: Google Maps: https://goo.gl/maps/h1com  & Bing Maps: http://binged.it/1xGDejC
Directions:
1. From Seattle/Duvall, take I-90 East and take Exit 54-Hyak.
2. At end of off-ramp, take a RIGHT.
3. In about 20 feet, take IMMEDIATE LEFT.  Look for brown "KEECHELUS TRAILHEAD" sign under a green "Dept. Of Transportation HYAK MAINT. DIV" sign.

4. In about .4 miles, turn RIGHT onto  Keechelus Boat Launch Road.  Look for the brown "IRON HORSE STATE PARK SNOQUALMIE TUNNEL" sign.
5. Take the first RIGHT into the IRON HORSE STATE PARK parking lot.
6. If you need to purchase a 1 Day Discover Pass, find the electronic meter near the restrooms in the middle of the parking lot.
7.  Along the east side of the parking lot, the Iron Horse Trail runs north-south.  Head to the west or north side of the trail, towards the stone & wooden sign and the gate visible in the distance.

With this map, follow the yellow line from Exit 54 to the parking lot.  Follow the orange path from the parking lot to the tunnel's entrance:


Monday, August 10, 2015

Iron Goat Trailheads and Routes near Stevens Pass

The Iron Goat Trail is rich in railroad history and located on National Forest land near Stevens Pass.  While it is possible for seasoned hikers to trek the entire trail in one day, breaking up the trail into smaller adventures by trailhead opens up many possibilities for hikers of all abilities.

Map of Iron Goat Trail from http://irongoat.org:

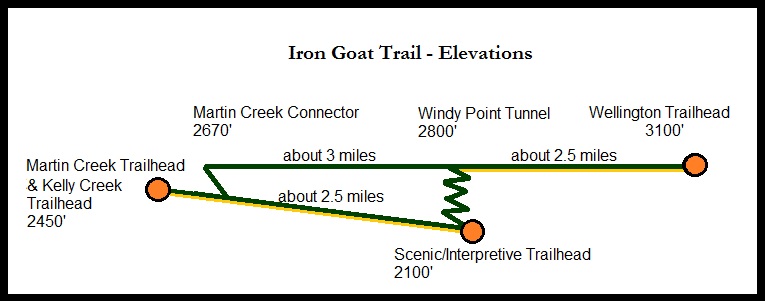
Simplified map of approximate elevations and distances between trailheads:

The Iron Goat trail has 3 trailheads:
*Wellington Trailhead
*Scenic / Interpretive Trailhead
*Martin Creek Trailhead.

WELLINGTON TRAILHEAD


The Wellington Trailhead is a really fun first hike.  The trail map shows that it is 2.5 miles from the trailhead to the Windy Point Tunnel.  However, there are 4 snow sheds along the way and it feels natural to turn back after any of them.

I didn't tell my 5 year-old about the tunnel, because I didn't want to disappoint him or have him think about how he couldn't do something.  I also didn't want him to push himself to the tunnel at 2.5 miles, only to be exhausted on the way back.  For folks up for a 5 mile hike, the Windy Point Tunnel entrance is a fun destination.  For beginners, walking from the parking lot, through the first and longest snow shed, and back is about 1 mile.  It is easy and flat and the experience of walking through an old snow shed is exciting, especially for littles!

From the parking lot, looking at the trail, we went to the right.  Going to the left leads to an old tunnel entrance.  It sounds like that would be exciting, but they blocked off the trail several years ago so hikers can't get close.  This was the best picture we could get.  It was a bummer to see the tunnel entrance in the distance but not be able to get a good view.  There are much better ways to see tunnels along the Iron Goat Trail so I'd skip this little leg.


From the parking lot, looking at the trail, we went right / west.  After passing some informational signs talking about the history of the old railroad town of Wellington, we saw the first snow shed.  Even though one side is open to daylight, I called it a "tunnel" because it's like the daylight basement of tunnels.  Jake was so excited he broke out our head lamps and insisted on turning them on.


With his headlamp in place, he set off through the tunnel.

Partway through the 1st snow shed, we encountered a little boardwalk out to a platform. It was a nice place to regroup in the sun and have a little change of scenery.


After a quick water break, we continued on our journey.  Along the way, Jake found a big stick.  Carrying a stick always make a hike more fun.


  Soon, we came to the end of the snow shed.

We decided to turn around here and head back.  Because this was a summer weekend, we went to Stevens Pass and took a scenic chairlift ride, which was completely new adventure!  Overall, this hike was great.  It was mainly flat, it had a tunnel-like experience, which provides shade in the summer and shelter in the rain, making this a great year-round hike.


BEFORE YOU GO 1. Check out recent trip reports at the bottom of the WTA page:

Iron Goat - Martin Creek & Scenic/Interpretive Trailheads:
http://www.wta.org/go-hiking/hikes/iron-goat-trail
Print out this map: http://irongoat.org/images/IGT2007.pdf

 2.  There is a pit toilet (like a permanent sani-can) on site, but it would be a good idea to bring some  TP to keep in the car, just in case there is none. There is no running water so bring hand sanitizer.
3. Bring snacks and water.
4. Since this is right off of Highway 2 and near Stevens Pass, weak cell service is likely.  However, it is never really guaranteed in National Forest land.  Print out directions and a map ahead of time, just in case.
5. A National Forest Recreation Pass is required for this trailhead.

GETTING THERE
1. Bing Maps: http://binged.it/1UxVDHP.  Google Maps: https://goo.gl/maps/yWpYv
2. There is no official address for the trail head, but it is easy to find.  Enter the address for the Skykomish Ranger Station into GPS: 74920 Ne Stevens Pass Hwy, Skykomish, WA 98288.  This is near milepost 50 on Highway 2.  If someone wants to meet a real Forest Ranger, feel free to stop and say "hi."  The Forest Rangers often have little things to give away to kids like a balloon or a sticker.  Sometimes they run out, so don't promise anything ahead of time.  They also have free maps as well as stuffed animals and books for sale.  Check this website for hours: http://www.fs.usda.gov/detail/mbs/about-forest/offices/?cid=fsbdev7_001655


-----
  There are several maps out there, and this is the best one I found: http://www.irongoat.org/maps.html.

After stopping at the Skykomish Ranger Station and talking to a Ranger about the best route, we started at the Wellington Trailhead (requires a forest service pass) because the Ranger said that there was both a tunnel to see and a snowshed. First of all, we missed the turnout. It is right before Stevens Pass and looks like a service road for Stevens Pass. Once we got to the Stevens Pass parking lot, I knew I had missed it so I turned around and found it right away. Because cell service is spotty, I was glad that I had printed out road maps & trail maps ahead of time to get myself back on track.

From the trailhead, we walked toward the tunnel. However, the path up to the tunnel has been closed for several years and is not only roped off, but the path leading up to the tunnel is overgrown to prevent folks from getting too close. My 5 year-old barely saw part of the tunnel structure from afar and wasn't too impressed. We walked back to the parking lot and started out the other direction, toward the snow shed. He really loved this. It's kind of like a tunnel, where there is a roof and one wall. However, the other side is open with concrete pillars for support. To him, it was a "pillar tunnel" and he loved it. We could have walked about 2.5 miles or so down to the Windy Point tunnel, but after walking the length of the 1st snowshed, we decided to turn around.

Next, we drove to the Iron Goat Interpretive Site because the Ranger mentioned there's a train car kids can climb on (outside only.) We spent a few minutes there. If the party is up for a 700' elevation climb, this is the quickest way to the Windy Point tunnel, which according to photos is cool. My friend and her 5 year-old made it up there and had a great time. I believe that no pass is required at this lot

Next, we decided to check out the Martin Creek trailhead. From the parking lot, we started out heading south on the paved trail that connects to the Interpretive Site. However, we took our first left up the connector trail to the upper trail. From there, we went south and found the 1st tunnel. We didn't go inside, but we did get pretty close to the outside - close enough that we could peek in. It was a cool sight! From there, we turned around and came back to the parking lot.

Before leaving the Martin Creek trailhead, we found a Kelly Creek trailhead on the NW part of the parking lot. We ventured to the tressle site, only to find out that it had been removed in 1929. That trail was a bit of a bust. From there, we decided we had explored enough for the day and headed home.

Of the 3 trailheads & trails we explored, the concrete snow shed at the Wellington trailhead was the easiest fun, although the Martin Creek trailhead was cool for leading us to an old decrepit tunnel. 

Sunday, August 9, 2015

Deception Falls Interpretive Trail - Easy Hike near Stevens Pass

When we knew we didn't have time for a long hike, we decided to check out the .5 mile trail at Deception Falls near Stevens Pass.  This hike had it all for a family: short distance, rivers and streams to see, little rocks for throwing into streams, big rocks for climbing on, a safe path for little explorers, several smaller waterfalls, and one medium-sized waterfall to see.

From the parking lot, there are 3 ways to explore the area:
1. Quickest - At the east end of the lot, there is a flight of about 30 stairs that go down to the main falls.  This is the quickest way to reach the main falls.
2. Easiest - At the west end of the lot, there is a .2 mile stroller-friendly and ADA / wheelchair-friendly paved path.  This loops through the trees and over to a viewing platform for the main falls.  Out to the falls and back along the same path takes about .4 miles.
3. Most complete - The 3rd option is taking the .5 mile "Nature Trail Loop" or the "Deception Falls Interpretive Trail."  From the west end of the lot, start out on the paved wheelchair-friendly path.  In a minute or two, take the stairs next to the sign for "LOOP TRAIL."  While this trail isn't always flat enough for a stroller, it is such a fun and interesting trail that even the littlest hiker will love it.  It is short enough to be doable for people of any fitness levels to be able to do it, and benches scattered throughout the trail give plenty of rest opportunities for anyone who wants to take a break.  Take time to read the interpretive signs, look for bugs, play with sticks, or toss rocks in a stream and kids will have a blast!


We started off by finding the paved path over on the picnic side of the parking lot.  Jake also found a stick.  For some reason, finding a hiking stick always seems to make hikes more fun.

Within a couple of minutes, we saw a sign saying that Lower Falls were straight ahead on the paved path and the Loop Trail was down the stairs to the left.  We went down the stairs.


At the bottom of the stairs, we found a log to climb on.  As we reached the little stream, we found a tiny waterfall behind a mossy grotto.  The pool beneath the waterfall was an aqua-tinted crystal clear pool.  I love living in the Pacific Northwest.

 
Past the grotto, we crossed the first bridge on the west side of the loop.  

We also found an old fallen tree that doubles as a pretend pirate ship.

Beyond the first bridge, we walked up a little hill and found the Tye River.  We left the loop and walked down a little path to check it out.  It is turquoise, clear, and beautiful.

We returned to the main loop and came to the hardest part of the trail.  Although the trail is generally pretty flat, we did have to huff a bit up the stairs.  The rest of the trail was smooth sailing, though.

Fortunately, near the top of the stairs there is another little leg out to the Tye River.  At the overlook, there is a bench that's handy for recovering from the stairs.  For someone with too much energy, it's also a good jumping spot.
 
Signs along the way talked about the ecosystem.
 
Near the end of the trail, we crossed a second bridge.  Jake loved running back and forth over the bridge made out of logs.


This was our view from the last bridge past the log bridge.  The furnace known as "Summer 2015" has left so many rivers and streams extremely low, or in this case, totally dry.  Normally water flows over the rocks.

Past the last bridge, we found our way back to the paved ADA / wheelchair-friendly trail.  We turned left and found Deception Falls under Highway 2. 

While the stairs that go directly to the falls under Highway 2 is the quickest path, I highly recommend taking the time to explore the Nature Trail route.  We saw fewer people and it was much more of a hands-on experience.

BEFORE YOU GO
1. Check out recent trip reports at the bottom of the WTA page:
Deception Falls National Recreation Area (NRA)
http://www.wta.org/go-hiking/hikes/deception-falls-nra
2.  There is a pit toilet (like a permanent sani-can) on site, but it would be a good idea to bring some  TP to keep in the car, just in case there is none. There is no running water so bring hand sanitizer.
3. Bring snacks and water.  While the loop is only .5 miles, kids have the most fun when they get to set the pace.  Although a fit adult can walk a half a mile in 15 minutes, plan on spending at least an hour on site so kids can explore whatever catches their interest.  There are several benches along the way which make for ideal snack stops for anyone needing a little rest or encouragement.
4. Since this is right off of Highway 2 and near Stevens Pass, weak cell service is likely.  However, it is never really guaranteed in National Forest land.  Print out directions and a map ahead of time, just in case.
5. Don't worry about looking up permit information.  There is no permit of any kind required for this lot.

GETTING THERE
1. Bing Maps: http://binged.it/1UxVDHP.  Google Maps: https://goo.gl/maps/yWpYv
2. There is no official address for the trail head, but it is easy to find.  Enter the address for the Skykomish Ranger Station into GPS: 74920 Ne Stevens Pass Hwy, Skykomish, WA 98288.  This is near milepost 50 on Highway 2.  If someone wants to meet a real Forest Ranger, feel free to stop and say "hi."  The Forest Rangers often have little things to give away to kids like a balloon or a sticker.  Sometimes they run out, so don't promise anything ahead of time.  They also have free maps as well as stuffed animals and books for sale.  Check this website for hours: http://www.fs.usda.gov/detail/mbs/about-forest/offices/?cid=fsbdev7_001655
3.  If you don't need to stop at the ranger station, continue past the ranger station.  In about 6 miles (and about 6 minutes), look for milepost 56.  Just past milepost 56 is a white and brown sign that says "DECEPTION FALLS LEFT 1/2 MILE."  About a half a mile past the sign, look for a paved driveway on the left side of the street.  There is a brown and yellow sign that says "DECEPTION FALLS - MT. BAKER SNOQUALMIE NATIONAL FOREST."


Wednesday, July 22, 2015

Red Top Lookout east of Snoqualmie Pass

The Red Top Lookout near the intersection of I-90 and Highway 97 is an amazingly fun experience!  While it is a rather steep trail, it is only a half a mile from the parking lot to the lookout, so even with lots of breaks every 3 to 5 minutes, it took us just under 30 minutes from the parking lot to the lookout.  We will definitely return!

From the parking lot, we started up the trail, and within one minute we saw the tower.  It was encouraging to see our destination from the start!


After stopping for some photos, I realized I had forgotten to put my NW Forest Recreation Pass on my dashboard.  Oops.  We returned to the car to take care of that and then started on our way again.


It was exciting to see the lookout tower so quickly and kept us motivated up the trail (this is a zoomed photo taken about 50 feet from the trail head.)

In a minute or two, we came to a fork in the road.  Although I would have guessed that we would have needed to take the uphill trail to the tower, signs are always appreciated.  We didn't have time to check out the agate fields this day, but it could be interesting to investigate another time.

Almost immediately, we felt the trail going up.  Jake wanted to take a break every 3 to 5 minutes, which is unusual for him.  Since these outings are all about fostering a love of outdoors, I didn't push him.  Since I felt the steep trail at 5,000' of elevation, this pregnant mamma didn't exactly mind the breaks, either. 

About halfway up, which was only about .25 miles or 15 minutes, we emerged from the trees and into a field that borders the forest and the rocky summit.  Our legs were burning, but seeing the lookout tower emerge back into view kept us going.

In a couple of minutes, we climbed out of the field and reached the rocky area just below the lookout.  We started feeling some wind gusts and the cool breeze felt nice on the hot day.  The trail kept heading up relentlessly, without any real flat areas to give our hamstrings & quads a break, but when we saw an unexpected triangular building, our curiosity propelled us up.  I thought it might be a storage shed of some kind for the lookout tower, with a steep roof to handle snow in the winter.

It turns out it is a composting potty with an incredible view!  (We didn't use it but we did peek inside.)

Just past the surprising outhouse, the path became a little extra steep and rocky.  Jake is actually a very safety-conscious hiker, so while I kept him close and uphill from me, I didn't worry too much.  We did go slowly and carefully, though, especially since we felt the wind more and more as we climbed higher.

Almost there!

Just before the final leg up to the lookout, we saw an interesting rocky outcropping to the left/north.  I had read that there was some sort of trail over there, but because there were sheer cliffs on either side of a narrow, rocky path, we didn't even try going over there.  I bet it would be really cool to stand on that outlook, but it would not be safe with any kind of kid, especially with the wind whipping around.  You can kind of see the outcropping on this map, too: https://goo.gl/maps/TmZ3E

We finally went up to the lookout and were so excited to meet a volunteer who let us inside!  If you look at how straight that flag is flying you can get an idea of how windy it was.  We were getting pretty chilly out there, even though we had only been out of the trees for about 10 minutes!

"WELCOME TO REDTOP L.O. VISITING HOURS: 9A.M. 6P.M. NOTICE TO VISITORS PLEASE COMPLY WITH LOOKOUTS INSTRUCTIONS NO PETS ON TOWER MAX 6 PEOPLE ON TOWER NO RUNNING ALLOWED. THANK YOU U.S.F.S.

When we entered the lookout, we appreciated the shelter from the wind almost as much as we enjoyed the view!  We sat down and enjoyed a little picnic while checking out Mount Rainer, which is about 100 miles to the SW.

The NE side of Mt. Rainier, as seen over the Teanaways:

Here is a link to a video I uploaded to facebook of this adventure: https://www.facebook.com/jennbot/videos/10153002434571361. 

After our picnic and some pictures, we headed back down to the car.  The hike back down required some stable ankles, but it went much more quickly than the hike up since we didn't need to take any breaks.  We had such a fun time that we'll be back for sure!

If you'd like to spend more time at the lookout the US Forest Service, here is a link to learn about volunteer opportunities: http://www.fs.usda.gov/detail/okawen/workingtogether/volunteering/?cid=stelprdb5447866.


BEFORE YOU GO
1. Make sure you have a NW Forest Pass.  If you plan on going on 5 or fewer hikes this year in National Forests, you can order a 1 day e-Pass for $5 that you print out at home before you go: http://www.discovernw.org/store_national-forest-recreation-epass-national-forests-in-washington-and-oregon-only_20281.html.  If you plan on going on 6 or more hikes in National Forests, it makes sense to purchase an annual pass.  There isn't a print at home version, but lots of places like REI sell them.  Here are more details: http://www.fs.usda.gov/detail/r6/passes-permits/recreation/?cid=fsbdev2_027010
2. Read recent trip reports at WTA to check out current conditions: http://www.wta.org/go-hiking/hikes/red-top-lookout
3. There is a sanican facility in the main lot.  However, places like that are never guaranteed to have TP.  Pack a roll with you, along with hand sanitizer, just in case.
4. Make sure to pack water.  It's only a 1/2 mile up to the lookout, but it has some steep parts.  It's always a good idea to pack enough to drink as well as some extra to flush an owie in case someone scrapes a knee.  In fact, it's wise to always pack the "10 essentials" on any hike, big or small: http://www.wta.org/hiking-info/basics/ten-essentials.
5. Pack a jacket.  Even on a 90 degree day, the wind really whipped at the top of the tower and we got goosebumps because there is nothing to slow down the wind between Mt. Rainier and the lookout.  Luckily it's only a little above the tree line so we weren't exposed for too long but we were sure missing our fleeces that were sitting in the 90 degree van below.
6. If you have hiking poles, this may be a good hike to bring them.  The trail is short - only 1/2 mile up.  However, it is steep, and with the wind at the top, poles could help with stability.  We don't have any and it wasn't an issue for us, though.
7. Note that the lookout tower isn't always open.  If a volunteer is staffing the tower, it should be open for visitors (unless they have briefly left the tower for some reason.)  If no one is volunteering that day, it will be closed.  There is no way to know for sure if someone will be on duty.  You can try calling the Cle Elum Ranger District at (509) 852-1011 ahead of time to see if anyone knows the volunteer status for the day of your outing.
8.  Budget time to allow for a slow drive on the forest service roads.  My Honda Odyssey had no troubles on the roads, but we took them slowly.  It took about 45 minutes from Highway 97 up to the trailhead and another 45 minutes back down.  It took us about 30 minutes up to the lookout and 20 minutes back down, so plan for 2 1/2 hours of driving and hiking from the point that you leave Highway 97 to the time that you return to the highway.  We also spent about 30 minutes in the lookout so it took us 3 hours from the time we left Highway 97 until the time we were back on that road.
9.  There is no cell service.  Make sure to download maps and directions before you go.  This is a copy of what I made and printed out:

GETTING THERE
*GPS* - I couldn't find an address for the Red Top Lookout trailhead, but here are some options to help get you there.  Make sure you search for the address on your GPS before leaving so that you know that your device can find it.  Fortunately, there are well marked brown & white signs along the way.
1. The lat & long coordinates for the trailhead are: 47.2970, -120.7596
2. I tried entering "Mineral Springs Campground" into my GPS, but it couldn't find it.  After getting home I found the official address for the campground is this: 27481 SR 97, Cle Elum, Washington. If everything else fails, you can enter that address into your GPS, then make your way .2 miles north and follow the directions below. The turnoff is just past the Mineral Springs Campground so that could get you most of the way there.
3. Try entering in the road name "National Forest Service Road 9702".  Also try variations "National Forest 9702", "NF-9702" or "NF 9702" or "FS-9702" or "FS 9702".  Take NF-9702 to the end of the road to find the trailhead.
*Directions* - If you don't have a GPS device that can find the trailhead, don't worry.  Everything is well signed along the way.  Directions from Seattle:
1. From Seattle, go EAST on I-90.
2. At exit 85, take ramp towards WA-970 North toward Wenatchee.
3. At the end of the off-ramp, turn LEFT (the only option that doesn't go back to I-90.)
4. In .5 miles, at the "T" in the road, turn RIGHT onto 1st St/WA-970.
5. In 9.8 miles, stay on main road as it turns into US-97.
6. In about 4.5 miles, notice the Mineral Springs Campground on the LEFT.  Keep going straight on US-97.
7. In about .2 miles, turn LEFT onto Forest Service Road 9738 / FS-9738.  It is a well-maintained gravel road that my Honda Odyssey drove with no problems.
8. In 2.6 miles, go left on NF-9702.  This road is a little bumpier, but there were no large potholes or anything that made this cautious driver worry.  The road was in great shape when we went.
9. Drive 4.5 miles to the trailhead and turn RIGHT at the signed entry.

10. There is a pit toilet (sanican) at the first part of the lot.  Note that it may or may not have TP, so it's a good idea to pack a roll and some hand sanitizer for any hike.  Continue past and there's a 2nd small lot where you can park a little closer to the trailhead.
11.  After parking, remember to place the NW Forest Recreation Pass on the dashboard.
12. Walk a little further up the road and just around the 1st bend the tower will pop into sight. 
13.  On the way back down the mountain, I plugged in our next destination: Slidewaters water park in Lake Chelan.  There are several Forest Service roads on the mountain, and my GPS plotted out a different route back down.  Not all Forest Service roads are in as good of shape as FS-9738 and FS-9702, so I ignored my GPS and retraced the steps on my map.  Other roads may have been just fine, but I didn't want to risk getting myself into trouble by taking my mini-van on a back road that I hadn't researched ahead of time.