Saturday, January 14, 2017

Easy Snowshoe Hike with a Forest Ranger at Snoqualmie Pass

Have you ever thought about snowshoeing, but have no idea about equipment or where to go?  Try an easy snowshoe hike with a United States Forest Ranger!  At $10 for kids and $15 for adults, a guided hike that includes equipment rental is a great deal and we had a fun time trying something new.

Driving up to Snoqualmie Pass, we took exit 52 and veered to the right at the end of the off-ramp to find the Snoqualmie Pass Visitor Center, which is run by the United States Forest Service.  Luckily for us, both the roads and the sky were clear, setting us up for a spectacular day on the mountain.  After being even luckier to find free street parking about a block away, we made our way to the ranger station.

Right at 1:00 PM, the US Forest Rangers gave an introduction to our crowd of about 20 people, telling the parents how to help kids put on snowshoes, and telling kids that they were welcome to hang out with the ranger at the front of the crowd, once we were on the hike.  Jake was pretty excited about that.

After we all checked out snowshoes, we followed the Ranger across the street and under I-90 to where the Pacific Crest Trail meets exit 52.  Once we were off the road and all on the snow, we stopped to strap on our snowshoes.  I was surprised at how easy they were to put on and at how comfortable they were to walk in.


At what would be the larger parking lot for the Pacific Crest Trail in the summer, the ranger stopped and had the kids gather around.  He talked about some animals that live nearby, including bunnies.  I honestly thought that bunnies were either brown or white, and that white ones tend to fare better in winter and brown ones fare better in summer.  However, I learned that brown summer bunnies actually have some sort of ability to gauge the length of sunlight each day.  As days grow shorter, their hair turns white and as days grow longer, their brown summer fur returns.  The Ranger joked that his mustache turned white when it became winter one year, but for some reason hasn't ever turned back to brown.

Along the way, we stopped several more times to see some bunny prints in the snow, along with bobcat prints nearby.  We also stopped to learn about birds, squirrels, and trees.

Jake points out why we need to stay on the trail.


BEFORE YOU GO:
1. To check out guided snowshoe programs at Snoqualmie Pass, check out availibility and options here: http://www.discovernw.org/store_winter-snowshoe-program-at-snoqualmie-pass_SNOWSHOE01.html.  If you have questions, their phone number is (425) 434-6111.
2. To research other guided snowshoe adventures, check out this page from Washington Trails Association: https://www.wta.org/go-hiking/hiking-info/basics/winter-skills-courses. It is a great compilation!
3. Check out road conditions at WSDOT: http://www.wsdot.com/traffic/passes/snoqualmie
4. Snowshoes are included in the adventure fee.  Dress in layers and bring a backpack snacks, water, an extra pair of gloves (in case a child takes one off and throws it in the woods without telling you, which is what one little girl did today.  Pro tip: if you have little ones that take off mittens and drop them, try putting a wool sock over their gloves but under their coat sleeve.  This is what I do with Tyler and we haven't lost a mitten, yet.)  I also brought little hand warmer packets, although we didn't need them, despite the 16 degree weather today.
5. Pack chains in your car and practice putting them on before you drive in snow.  Also, pack a plastic garbage back or something to kneel on when putting on chains.  The roads were clear for us today, but it's always good to be prepared in the mountains.
6. Pack a sled for after your snowshoe adventure, if you're inclined.  The Snoqualmie Pass Visitor Center is just a mile or two from the Hyak Sledding Hill.  If we had time and didn't have to pick up Tyler at the Pro Club's childcare, I totally would have taken us sledding afterwards.
7. Bring some cash for parking, just in case.  We found free parking along the street, but we were lucky that someone happened to leave at the right time.  There are some pay lots on the road, and if we started cutting it close to the adventure time, I would have wanted to make sure to have cash on hand for some pay lots.

GETTING THERE:
1. The Snoqualmie Pass Visitor Center is located at 6905 SE Snoqualmie Pass Summit Road, Snoqualmie Pass, WA.  https://www.fs.usda.gov/detail/mbs/about-forest/offices/?cid=STELPRDB5238217
2. To get to the Snoqualmie Pass Visitor Center, take I-90 to Exit 52.  At the end of the off-ramp, veer right.  The Visitor Center is on the right side of the street in about 2 blocks.
3.  Street parking is available along Snoqualmie Pass Summit Road, just past the Visitor Center.
4.  For our hike, we walked without snowshoes on along the street and under I-90 to the Pacific Crest Trail.  Once on the trail, we put on our snowshoes and made a little loop.


Sunday, January 1, 2017

Make Ahead Freezer Sandwiches

Did you know you can make sandwiches ahead of time, freeze them, toss a frozen one into a lunch bag in the morning, and have a thawed sandwich ready for lunch?  This is my favorite parenting hack!  This makes getting lunches ready in the morning a total breeze.


Now, whether I pack everything but the sandwich the night before and toss one in in the morning or whether Jake packs his lunch on his own, having sandwiches ready to go makes things so much easier!

 Ideas that have worked well for us:
*Ham & cheddar cheese with mayo
*Turkey & havarti with mayo & mustard
*Peanut butter & honey
*Almond butter & jam
*Grilled cheese sandwich (or grilled ham & cheese sandwich)
*Quesadilla (sometimes with chicken, cumin, and chili powder for extra flavor) 

Tips:
1. Meat, nut butters, jam, condiments, and cheese freeze and thaw well.  Veggies do not.  If you want lettuce or tomato on a sandwich, it's best to pack it in a separate bag and add it to the thawed sandwich at lunch.

2. Hot sandwiches like grilled cheese sandwiches, or even quesadillas, can be frozen.  For hot sandwiches, make sure to let them cool to room temperature before putting them in the freezer, though.  If I make grilled cheese sandwiches for dinner, I often make an extra one or two that can be tossed into the freezer once it cools to room temperature.  It just helps add variety.

3. To make sure your family member will have enough time for thawing, do a test run over the weekend.  Take a sandwich out of the freezer around the time you normally leave and try eating it around the school's lunchtime.  This will help assure you your child won't be sadly gnawing on a frozen sandwich at lunch.  If it turns out there isn't enough time for the sandwich to fully thaw, you can always move one from the freezer to the refrigerator the night before.  The bread always tastes a little drier to me when I try that, although Jake never notices.

4. Once you try it out a couple of times, make a batch of sandwiches.  Either make 5 for the week on Sunday or try converting an entire loaf of bread into sandwiches in one fell swoop.

5. Frozen sandwiches typically last a month before the bread becomes kind of stale tasting when thawed.

6. When making batches of sandwiches, using cookie cutters is just as easy as using a knife to cut them.  Plus, it makes the sandwich more fun for the kid!  You could try using certain cookie cutters for certain sandwich combinations or have some holiday theme with the shapes, if you want. I often just use one shape for all of the combos, though, because that's the easiest.

7. On school nights when things are too busy to put together a nice dinner, grab a frozen sandwich and toss it in a pan, microwave, or panini press for a quick hot dinner.  Apparently toasted PB&Js are tasty!

8. I usually get ham-off-the-bone or rotisserie chicken at the deli counter of the grocery store, to avoid overly processed meats.  While there, I keep my eye open for sales.  With frozen sandwiches, it's easy to buy a pound of roast beef or something you may not normally buy, turn it into frozen sandwiches, and sprinkle them throughout the month. That way, you can basically use the sale price over a longer period of time while adding variety to the mix.

9. During the sandwich assembly process, it's easy to get the kids involved so they feel invested in their lunch.  Jake loves to be in charge of using the cookie cutters!

10. When using a cookie cutter, if you can't get a clean cut by pressing the cutter down into the sandwich, try flipping the sandwich over and pressing it down onto the cutter, like the lower center sandwich in the top photo.

Sandwiches assembled & cut

A loaf's worth of sandwiches, ready for the freezer in just 10 minutes!


Sunday, December 18, 2016

Sledding Near Snoqualmie


Sledding Near Snoqualmie


Interested in sledding near Snoqualmie Pass? Here are 2 options to check out this winter with some variety in amenities, activities, and cost.

#1 - Hyak Sledding Hill

Hyak Sledding Hill is a great place for sledding.  The parking lot is adjacent to the Iron Horse Trail, which also makes it a great starting point for cross country skiing, snowshoeing, and relatively flat hikes on groomed trails.  Here's a trip report from 2 years ago when Jake & I took an easy snowy hike along the Iron Horse Trail & Keechelus Lake: http://dotsonstories.blogspot.com/2015/01/keechelus-lake-iron-horse-trail.html

Features of Hyak include:
1. A sledding hill long enough to be fun for older kids
2. A ski patrol / sledding "lifeguard" at the top of the big sledding hill during peak times to help manage safety
3. A couple of smaller, unofficial sledding hills great for younger kids 
4. A *heated* restroom facility in the middle of the parking lot with running water.  This makes potty breaks so much easier for little ones compared to sanican or no facilities, like most sledding hills.
5. You can bring your own sled, so you can choose what style of sledding or tubing your family prefers.
6. It is very close to I-90, so it is likely that the road will be maintained about as well as any road up at Snoqualmie.

Things to be aware of:
1. While the road to the entrance of the Hyak Sledding Hill is likely to be as drivable as any road in the area, there is a small hill from the road up into the parking lot.  This is not always as sanded or de-iced as I would expect for an entrance to a sledding hill.  Bring chains with you (as with any snowy outing), practice putting them on before going, and be prepared to put them on if needed.  There was a lot of snow in the parking lot, I did not need chains for my Honda Odyssey, and very few cars in the lot had chains.  The heavy traffic in and out kept the road driveable, but if you go on a day where it's been sunny for a few days, which could result in melting & re-freezing, come prepared.
2. Both a Washington State Discover Pass and a Snow Park Pass with Groomed sticker are required.

Permit Details:
To park in this lot, you need both a Discover Pass and a Sno-Park pass with the groomed sticker.  A day pass for the Discover Pass costs about $10 and a day pass for the groomed Sno-Park Pass costs $20.  You can pay on-site via an attendant if the entry booth is staffed or at the pay station in the parking lot.  Both accept credit cards.  An annual Discover Pass runs about $30 and an annual Sno-Park Pass with the groomed lot sticker runs $80, so if you plan on coming more than 3 or 4 times this season, annual passes may be a way to go.  Just to make things a little more complicated, you can also use an annual Discover Pass and just buy a day pass for the Sno-Park pass if you like hiking year-round but only plan on going sledding here once or twice. You can buy both ahead of time at REI and several other retailers.


Single DayAnnual PassMore info
Non-Motorized Sno-Park Permit with groomed sticker$20$80https://fortress.wa.gov/parks/ecomm/prod/Store/SNO/SnoChoice.aspx 
Discover Pass$11$33http://www.discoverpass.wa.gov 
Sno-Park/Discover Combo$30N/Ahttps://fortress.wa.gov/parks/ecomm/prod/Store/SNO/SnoChoice.aspx 

Getting There:
Address: For GPS, try entering: 15 Keechelus Boat Launch Road, Snoqualmie Pass, WA 98068. This may not be recognized by all GPS systems, but it may get you close.
Link to map: http://binged.it/1xGDejC 
Directions: 
1. From Seattle/Duvall, take I-90 East and take Exit 54-Hyak.
2. At end of off-ramp, take a RIGHT.
3. In about 20 feet, take IMMEDIATE LEFT.  Look for brown "KEECHELUS TRAILHEAD" sign under a green "Dept. Of Transportation HYAK MAINT. DIV" sign.
4. In about .4 miles, turn RIGHT onto  Keechelus Boat Launch Road.  Look for the brown KEECHELUS TRAILHEAD" sign.
5. Take the first RIGHT into the Hyak Sledding Hill parking lot.

Photos:
Main sledding hill at Hyak
One of the smaller sledding hills at Hyak
Parking pass machine in Hyak parking lot

#2 - The Summit Tubing Center

The Summit Tubing Center is a dedicated tubing slope with more structure than Hyak.  Guests purchase tickets for 2 hour sessions and must use tubes provided.  Prices for tickets range from $5 for children 5 and under and up to $25 per person for 13 year-olds and older, so this route can get pricey pretty quickly.  Their website has all of the info so I'll link to it here: http://www.summitatsnoqualmie.com/activities/tubing/rates-and-hours 

Photo:
http://www.summitatsnoqualmie.com/mountains/tubing


Monday, October 3, 2016

Digital Art - Planets

This digital art project is great for kids as young as kindergarten. The basic skills of this project are just filling in a background color and drawing a circle.  While these two tasks may take a while and require assistance with kindergarteners, older kids will have fun adding all kinds of silly extra details.

Although we use a specific program at school called Drawing for Children, Microsoft Paint installed on all Windows computers can get the job done, too.


Basic Planet
1. To open Microsoft Paint, hit the Windows Key and type: mspaint
2. When Paint opens, change the background color by clicking the paint can that's tipping over.  It's like an entire can of paint is spilling all over the page.  If black isn't selected by default (or if you want a different color for outer space) click one of the color squares to the right.

3.  Next, select a color for the planet.  In Microsoft Paint, select a circle shape and change the fill to "solid color."


4. To change the fill color from the default white to another color, click the "Color 2" square and select a color.

5. If the planet has craters, create smaller circles of the same color within the main planet circle.

6. If the planet has rings, try using a solid rectangle of another color.

This should get kids up and running with a new planet.  Experiment with different colors for the planet or outer space.  Maybe the planet isn't even a circle.  If your kids have access to any drawing program with more features than MS Paint, add a clip art alien or dinosaur to the scene!  Blue scribbles can be a comet, and white dots can be background stars.  Do your kids know any constellations they want to add?  (Jake's favorite constellation is w-opia / Cassiopeia.)


Adding Continents
If kids want to create continents, they should have fairly solid mouse control.  The polygon shape is like a connect-the-dots sort of shape, where the student clicks on various points to create connected lines.  When the end is connected the the beginning, the shape is created.  If a student doesn't have the mouse agility to accomplish this, it can be frustrating for them.  I don't usually mention this to the kindergartners just starting out.  Creating craters is enough planetary detail for them.  If you have an older student who really wants to try this out, find the polygon shape at the top and set the fill to "solid."  Play with the line width and Color 1 for the outline and Color 2 for the color of the shape.

Adding Bands
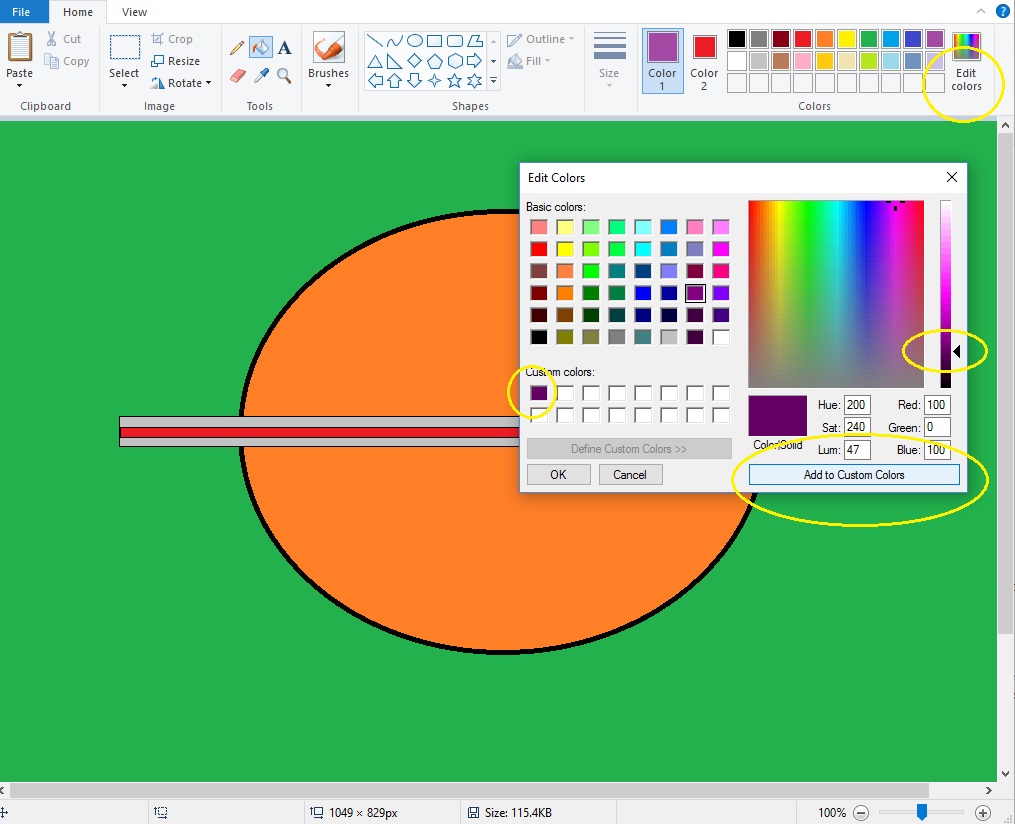
If the students want to create bands, or lines, on their planet, first try using narrow rectangles.  To look like bands that are a little less solid than a rectangle, try painting or drawing freehand, with a different type of brush.  In Microsoft Paint,click the "Brushes" button near the top.  Select a brush style, like "Crayon."  Additionally, play with line size and Color 1 color.


To create a color different than the default 20 colors, click "Edit Colors."  Click a color in the rainbow box, and make it brighter or darker with the slider bar on the right.  When the custom color box looks to be the right shade, click the big "Add to Custom Colors" button at the bottom of the dialog.

 Example of solid rectangles used for rings, and crayon drawing used for gassy bands.


Pokémon Planet
Have a Pokémon fan in the house?  Here is a step-by-step to creating a Pokémon planet!
1. Create a white circle.  Change the line size to be the widest.  This will help the center rectangle blend with the outer edge of the circle.

2. Create a narrow, solid, and black rectangle in the middle.

3. Change the line size to be a medium width, and create a solid, white circle.

4. Select red for "Color 1" and use the spilling paint can to fill the upper arc.

Microsoft Paint and other basic drawing applications have a limited feature set, which helps prevent kids from getting too overwhelmed and lost.  However, even with a basic tool set, a little imagination can create lots of fun new scenes!

If you want to give kids an opportunity to explore with digital drawing, but don't exactly want them messing up your nice computer, the public library has computers that are free for members to use.  Last I checked, the Duvall Public Library had Microsoft Paint installed.  Before heading down, call to confirm, though.  Especially during rainy days, this can be a fun and free way to get out of the house and try something new!

It is fun to see what they will come up with!

Saturday, August 13, 2016

Summer chairlift ride at Stevens Pass


After exploring the Iron Goat Trail near Stevens Pass in August, we tried a new adventure: taking a scenic chairlift ride at Stevens Pass in the summer!  It was so fun!

Stevens Pass operates a chairlift on the weekends in the summer so that mountain bikers can take the lift up and ride down incredible mountain bike trails. You don't need to have a bike with you to buy a day pass, though.  Just like chairlift passes for skiers, one day pass enables unlimited riding, so we had a lot of fun with this!

Every other chair is specially designed to carry mountain bikes.


Jake was sufficiently impressed at the folks doing jumps while riding mountain bikes down the mountain.


At the top, we got off, walked around a little, and had a picnic.


After our picnic, we rode the chairlift back down.  We rode around a couple of more times before getting back in our car to check out the Interpretive and Martin Creek trailheads along the Iron Goat Trail.


BEFORE YOU GO:
1. Check out the hours of operation of the Scenic Chairlift Rides at Stevens Pass: https://www.stevenspass.com/site/summer/other-summer-services

GETTING THERE:
1. The address for Stevens Pass is 3001 NE Stevens Pass Hwy, US 2, Skykomish, WA 98288.

2. Park on the south side of Highway 2, just pass the trail overpass.
3. Go into the main lodge to purchase a lift ticket.
4. Head over to Hogsback Express - the only lift running in the summer.

Saturday, July 2, 2016

Rattlesnake Ledge

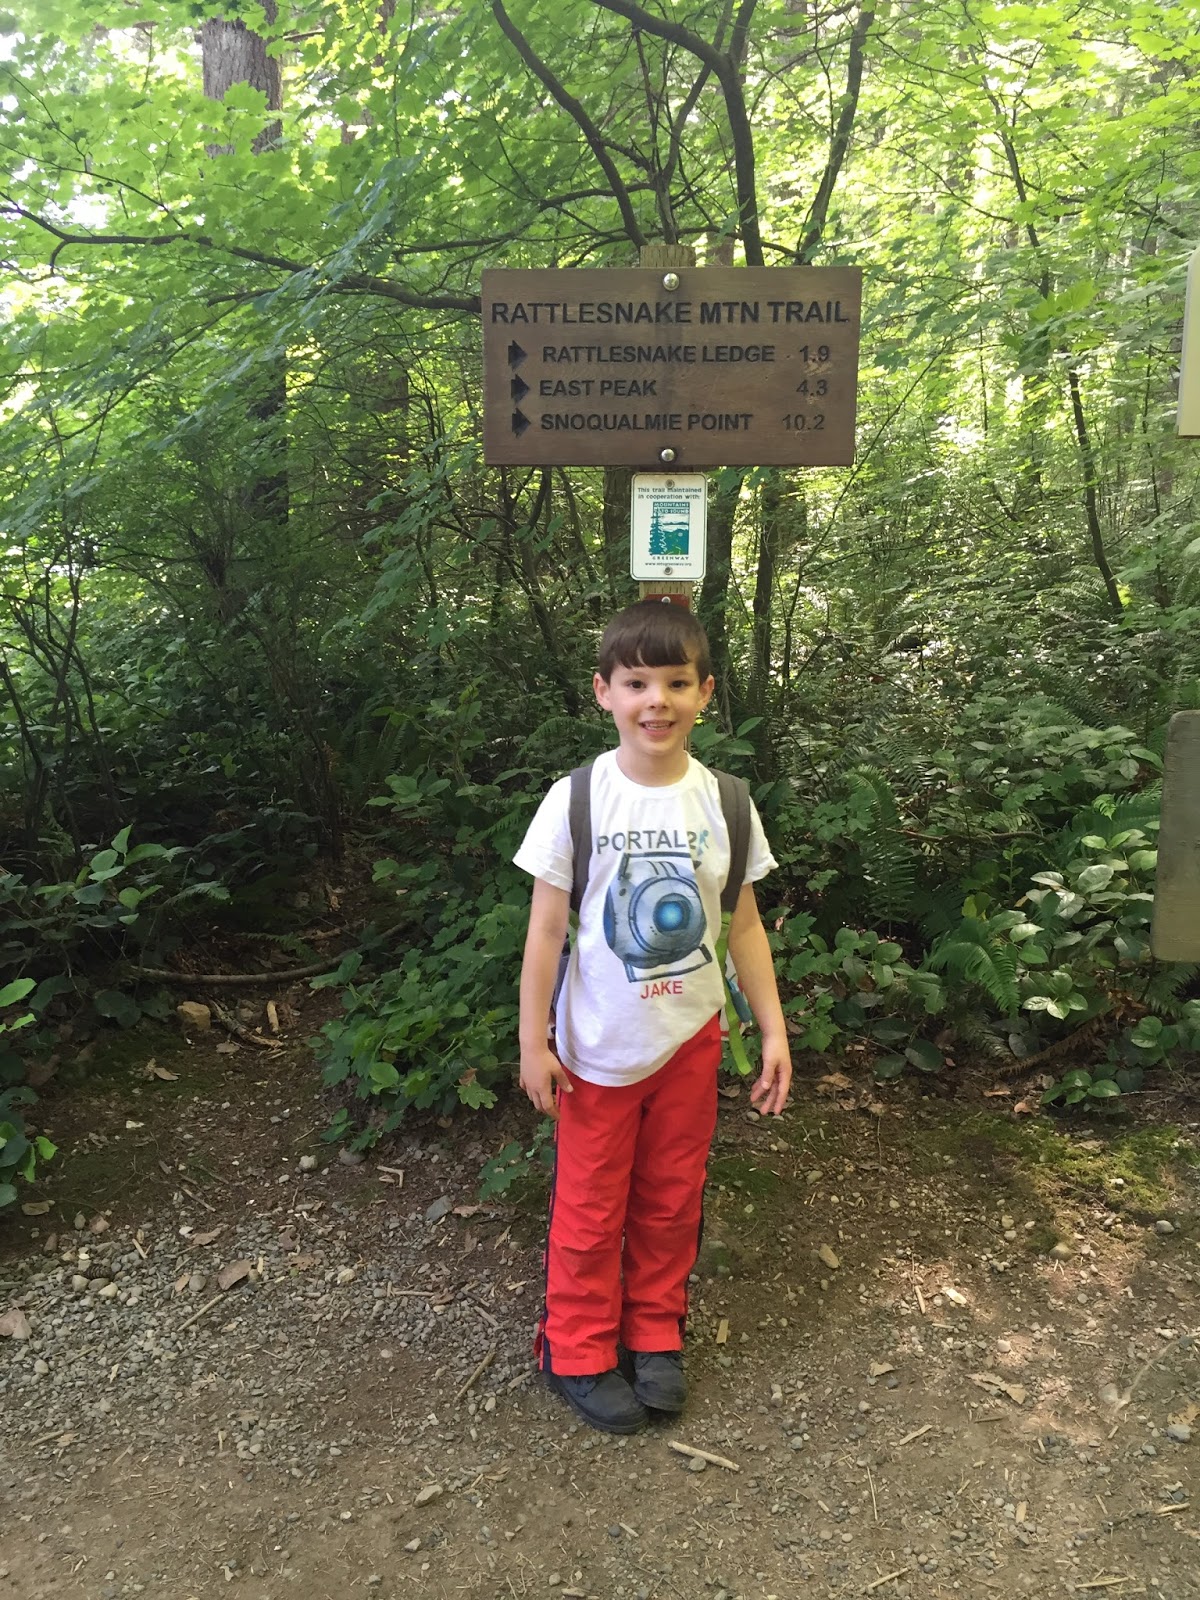
Today Jake and I had a great time checking out Rattlesnake Ledge near North Bend.  Although we have spent many fun days at Rattlesnake Lake before, it was great to finally take Jake up to the ledge above.


Now that we have 6 month old baby Tyler, I have to plan out hiking logistics a little more than before.  Since he is not sleeping through the night and not even taking reliable naps yet, my energy has been hovering at a MOMbie-zombie level since about December.  Although I've been exercising enough to finish my first 10k a couple of weeks ago, I still am not at my pre-pregnancy fitness level yet. I have carried Tyler in a front carrier for several 5+ mile hikes with minimal elevation gain, but at 20+ pounds he is getting a little heavy (and warm) for a front carry up a thousand feet with some rocks and roots to navigate.  Although he is likely ready to go in the frame carrier, I didn't want to try it out for the first time with him on Rattlesnake Ledge, so he stayed home with Andy while Jake and I went out for an adventure.

Because of the easy drive, the large parking lot and well-maintained trail that can accommodate lots of people, and of course the incredible view, Rattlesnake Ledge is one of the most popular hiking trails along the I-90 corridor.  Since the large lot and even overflow lot fill up every weekend, I decided to take Jake on a Friday, the only weekday he doesn't have swim lessons this summer.  When I checked the forecast, it predicted a cloudy but rain-free day.  These are my very favorite types of days for hiking!  Clouds often deter some folks, so the trails are less crowded.  Plus, it keeps the hike cooler, which is a total bonus.

However, when I woke up Friday morning, I saw that weather.com indicated it would be a sunshine plus one cloud in the morning but a 3 cloud icon in the afternoon.  I had some concern about the ledge being obscured in the clouds, which would take away from the view. Last fall we went to the top of the Skyline Trail at Mt. Rainier.  Normally there is a spectacular view of Rainier, but when we went, this was our view:
Labor Day 2015. 5 months pregnant on Mt. Rainier's Skyline Ridge Trail
However, Friday was really the best day of the week for our busy summer schedule.  Plus, the mountain isn't exactly going anywhere.  If we "only" got to do a great hike in great hiking weather, we could always come back again!  So, with dark clouds in the sky and a couple of misty droplets speckling the windshield on 203, we set out to Rattlesnake Lake.

When we arrived at the Rattlesnake Lake Recreation Area, Jake wanted to check out the ledge with the binoculars at the Education Center.  Although I was eager to get on the trail, the whole purpose of taking him out to explore is to foster a love for being out there.  If a 10 minute detour would help get him excited for the day, I was fine with a side excursion.  

While I saw clouds over the ledge that could possibly totally block our view by the time we got up there (like our experience on Mount Rainier last fall), all he could see was real people moving around on the ledge and he was so excited he would soon be one of them! 


After Jake finished scouting out our destination, we drove back to the trailhead at the north end of the lake and started on our way.


Near the start of the trail is a large boulder.  Jake had fun pretending that going under the overhang was like going in a cave.  Then we had fun taking silly pictures.  Jake is so strong!

Up ahead, he found another small rock cave.

Wait, where did he go?

He discovered all kinds of stumps, logs, and rock for jumping off of.

One thing that is fantastic about this hike is that the first half to two thirds are really easy.  Although we steadily climbed, the path wasn't steep.  Neither of us broke a sweat or felt any muscles burn for the first hour and a half.  We stopped here after about 10 minutes or so because I realized I had forgotten to put on bug spray.  Thankfully I always carry my hiking essentials so we had some on hand, even though I hadn't been thinking about it. Since stopped, it was a good opportunity for a couple of crackers & some water.  Isn't it great how few people were on the trail on this cloudy morning?

Equipped with a layer of protection from mosquitos, we set out again.  As we passed this mossy boulder with ferns on top, Jake noticed it looks like an alien's head.  Do you see it?

I carried a topographical map with us, and I could tell that the couple of switchbacks near the end of the trail would be steeper than the lazy meander of the first part of the hike.  We stopped at a part of the trail that had a wider area off to the side so that we could rest, hydrate, and re-fuel before the last part.  You can tell how exhausted Jake felt after the first 2/3rds of the hike.  Of course, even if he had been tired, the kid will never pass up the opportunity to climb up & jump off of something.  I told him to knock himself out because it looked like the upper part of the hike would be too narrow and steep for forest parkour.

Ladybug!  We saw lots of millipedes and slugs on the way up, but this was the only ladybug that Jake touched.  Granted, it was dead so it couldn't fly away, but Jake thought it was really cool to check it out up close.


While we had to put in some work for the last bit up, it was never hard enough that we needed to take breaks. It still felt great to reach the top, though!  As an extra bonus, by the time we got up there, the clouds had unexpectedly lifted!  The sky was still overcast, but we had no problem seeing the turquoise lake below.  The top was a precarious jutting of rock, similar to the top of Little Si.  I am glad I didn't have the frame carrier on, but Jake was a wonderfully responsible hiker as usual.

We had a nice little picnic of sandwiches, pretzels, applesauce pouches, and a piece of candy I let him bring.  After we hiked down, drove back to the Rattlesnake Lake Education Center to check out the binoculars again as well as shoot ping pong balls around the room in the clear vacuum tubes.  If you're not up for hiking up to the ledge but want to check out Rattlesnake Lake sometime, I highly recommend going to the Education Center next to the SE part of of the lake.  The beach is great for wading or throwing rocks and there is a flat wheelchair/stroller accessible path that runs along the east side of the lake: http://dotsonstories.blogspot.com/2015/09/rattlesnake-lake.html.

BEFORE YOU GO
1. There are no fees or permits, or admissions fees to worry about.  Everything here is totally free!
2. Check out the website for official info and hours:
http://www.seattle.gov/util/EnvironmentConservation/OurWatersheds/CedarRiverWatershed/RattlesnakeLake/index.htm
3. Trail map:
http://www.seattle.gov/util/cs/groups/public/@spu/@conservation/documents/webcontent/strolling_200312081358153.pdf
GETTING THERE
*Address: 19901 Cedar Falls Road SE,  North Bend, WA 98045
*Google Maps: https://goo.gl/maps/iaEgn
*When entering the Rattlesnake Lake recreation area, parking for hikers heading up Rattlesnake Ledge is immediately on the right.  
*The north end of the lake, by the boat launch, is the parking area for the Rattlesnake Ledge trailhead: http://www.wta.org/go-hiking/hikes/rattle-snake-ledge.    Because it is such a fun hike, it is really popular on weekends, especially in the mornings as hikers set out.  If the parking lot and the overflow lot are full on the north side of the lake, people often park on the shoulder of Cedar Falls Road leading into the park.
*There are restrooms with running water at the Educational Center and sani-cans at the Rattlesnake Ledge trailhead.  Check the trail map for all locations.
*Once parked, follow the signs to the trailhead.  Everything is well signed.